MSTS - Helpful Facts and Links - Part 34 (Common Loads)
Page 1 of 1
 MSTS - Helpful Facts and Links - Part 34 (Common Loads)
MSTS - Helpful Facts and Links - Part 34 (Common Loads)
This is another part in the series of posts that are meant to give a simple history of MSTS, point people to the various links considered vital to maximising the performance, describe elements within the MSTS hierarchy as well as allowing an understanding of the various components that make up MSTS.
This HFL part will look at Common Loads and is based on notes provided by the wagon guru Ian Macmillan, and assumes that the modeller is using Train Sim Modeller (TSM).
The purpose of the Common.Loads folder is to make loads available to all wagons, and thus avoid duplicating the same file in each wagon folder and hence reducing the folder size. In addition it goes further by aliasing the load ACE file so that all relevant shape files use the same texture - again saving duplication.
Conditions for using the Common.Loads folder.
The modeller has to agree that the load will be available to all other users and can be included as part of other wagon uploads without further permission. Similarly the textures associated with that load may also be used by other modellers for their projects. This ensures that one modeller’s wagon of crates will have the same load as another modeller and the same crates can be used as scenery on the loading platform. It also makes it possible to re-use suitable existing textures.
Making the Load.
1. Create or copy the ACE file for the load texture into the MSTS wagon folder.
e.g.

2. Please keep it separate, and do NOT include it within the wagon ace.
3. Open ACE file in TGAtools to export it to the relevant wagon folder in TSM.

4. Create the load in TSM to fit the wagon; i.e. length, width and height, and make sure that it is centred to the origin.

5. Remember that a freight animation must be a single part and so join up all bits.
6. Save the part in TSM.
7. Please do not save the wagon with the load included.
8. Click on File/New and load the part.
9. Select Object/Properties and set the visibilities to 1000, which sets the visibility, or level of detail (LOD).

10. Click on File/Project Properties and name the part.
11. Set Target Type as Static Scenery.
12. Click on OK.

13. Go to Create Train Simulator Object.
14. Change the Route to None - Specify Path.
15. Click on browse next to the Folder box and set the path to the wagon folder in the MSTS installation.
16. Untick ALL the boxes in Processing Objects.
17. Click on Continue.

18. A report is displayed.

19. The load should now be located in the relevant Wagon folder.
20. Delete the associated SD file as it is not needed for a Freight Animation.
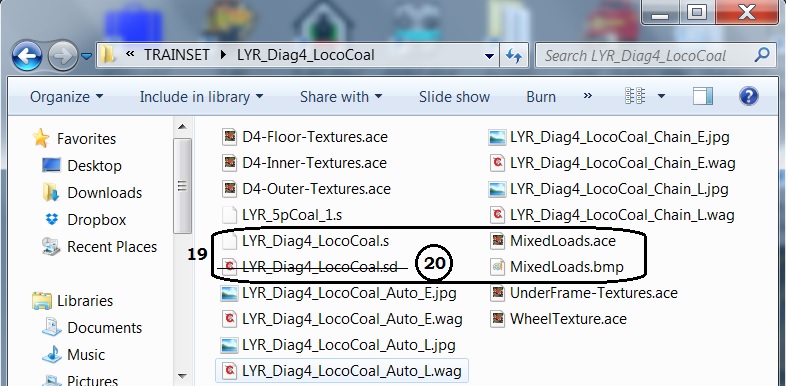
21. Test by loading the Wagon shape in Shape Viewer and loading the load shape as a second shape.

22. A further test would be to try it in other similar wagons, although you might need to adjust the load in TSM to fit thinner or wider wagons.
23. Make a copy of the WAG file and rename it to include the load.
24. Within the WAG file add the following line
FreightAnim ( LOAD.s 0.0 3.0 0 ) where LOAD is the load name; e.g. coal, sand, etc.

25. Finally test the wagon and load in MSTS.

26. If the load is complicated with a high polygon count it may be worthwhile using SFix to split it into sub objects.
Adding the load to the Common.Loads Folder
1. Rename the main Common.Loads folder and make a new one.

2. Open the new Common.Loads folder and create a wagon type folder.
3. Name it or use an existing name if the load fits.
4. Copy the load shape file into the wagon type folder.
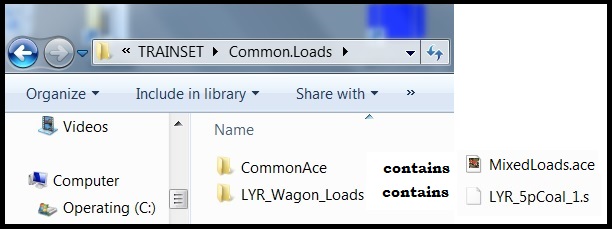
5. Create a CommonAce folder within the Common.Loads folder and copy the load Ace into it.
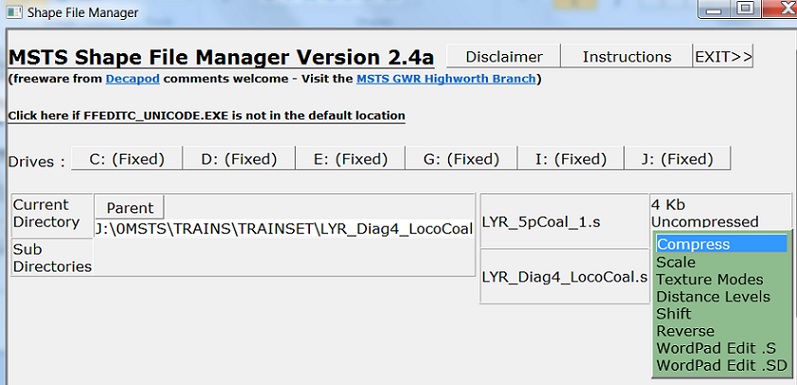
6. Open the load shape file in Shape File Manager.
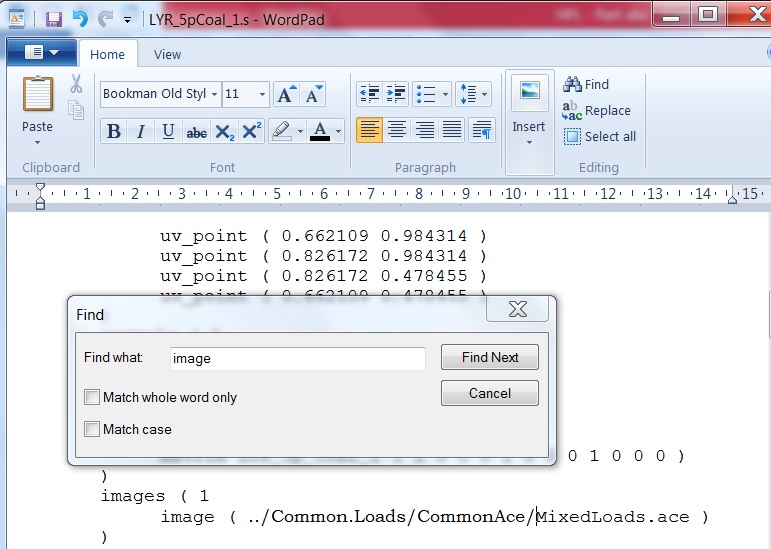
7. Use Find to search for “ace”.
8. This should take you to the following line
image ( LOAD.ace ) where LOAD is your ACE file name; e.g. coal, sand, etc.
9. Edit this to line to read
image ( ../Common.Loads/CommonAce/LOAD.ace )
10. Close the file and compress it.
11. Edit the FreightAnim line in your .wag file to read
FreightAnim ( ..\\Common.Loads\\”wagon type folder”\\LOAD.S 0.0 3.0 0 )
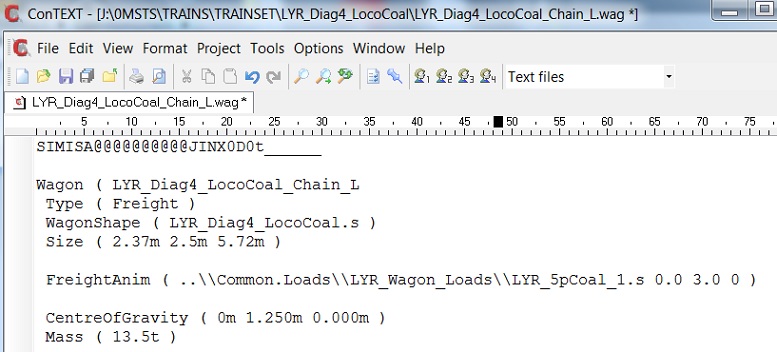
12. Test the wagon and load in MSTS.
13. If all is well, move the new Common.Loads into the wagon folder and rename your main Common.Loads folder back to Common.Loads.
14. Copy the new Common.Loads folder into the Trainset folder and allow to overwrite.
15. Test again and, if all is well, delete the LOAD ace and LOAD shape files from your wagon folder. It is recommended that the relevant Common.Loads folder is kept in the new wagon folder as a backup. It is also strongly recommended that a copy is sent to Ian Macmillan to add to the Master Common.Loads.
This is another part in the series of posts that are meant to give a simple history of MSTS, point people to the various links considered vital to maximising the performance, describe elements within the MSTS hierarchy as well as allowing an understanding of the various components that make up MSTS.
This HFL part will look at Common Loads and is based on notes provided by the wagon guru Ian Macmillan, and assumes that the modeller is using Train Sim Modeller (TSM).
The purpose of the Common.Loads folder is to make loads available to all wagons, and thus avoid duplicating the same file in each wagon folder and hence reducing the folder size. In addition it goes further by aliasing the load ACE file so that all relevant shape files use the same texture - again saving duplication.
Conditions for using the Common.Loads folder.
The modeller has to agree that the load will be available to all other users and can be included as part of other wagon uploads without further permission. Similarly the textures associated with that load may also be used by other modellers for their projects. This ensures that one modeller’s wagon of crates will have the same load as another modeller and the same crates can be used as scenery on the loading platform. It also makes it possible to re-use suitable existing textures.
Making the Load.
1. Create or copy the ACE file for the load texture into the MSTS wagon folder.
e.g.

2. Please keep it separate, and do NOT include it within the wagon ace.
3. Open ACE file in TGAtools to export it to the relevant wagon folder in TSM.

4. Create the load in TSM to fit the wagon; i.e. length, width and height, and make sure that it is centred to the origin.

5. Remember that a freight animation must be a single part and so join up all bits.
6. Save the part in TSM.
7. Please do not save the wagon with the load included.
8. Click on File/New and load the part.
9. Select Object/Properties and set the visibilities to 1000, which sets the visibility, or level of detail (LOD).

10. Click on File/Project Properties and name the part.
11. Set Target Type as Static Scenery.
12. Click on OK.

13. Go to Create Train Simulator Object.
14. Change the Route to None - Specify Path.
15. Click on browse next to the Folder box and set the path to the wagon folder in the MSTS installation.
16. Untick ALL the boxes in Processing Objects.
17. Click on Continue.

18. A report is displayed.

19. The load should now be located in the relevant Wagon folder.
20. Delete the associated SD file as it is not needed for a Freight Animation.

21. Test by loading the Wagon shape in Shape Viewer and loading the load shape as a second shape.

22. A further test would be to try it in other similar wagons, although you might need to adjust the load in TSM to fit thinner or wider wagons.
23. Make a copy of the WAG file and rename it to include the load.
24. Within the WAG file add the following line
FreightAnim ( LOAD.s 0.0 3.0 0 ) where LOAD is the load name; e.g. coal, sand, etc.

25. Finally test the wagon and load in MSTS.

26. If the load is complicated with a high polygon count it may be worthwhile using SFix to split it into sub objects.
Adding the load to the Common.Loads Folder
1. Rename the main Common.Loads folder and make a new one.

2. Open the new Common.Loads folder and create a wagon type folder.
3. Name it or use an existing name if the load fits.
4. Copy the load shape file into the wagon type folder.
5. Create a CommonAce folder within the Common.Loads folder and copy the load Ace into it.

6. Open the load shape file in Shape File Manager.

7. Use Find to search for “ace”.
8. This should take you to the following line
image ( LOAD.ace ) where LOAD is your ACE file name; e.g. coal, sand, etc.
9. Edit this to line to read
image ( ../Common.Loads/CommonAce/LOAD.ace )

10. Close the file and compress it.
11. Edit the FreightAnim line in your .wag file to read
FreightAnim ( ..\\Common.Loads\\”wagon type folder”\\LOAD.S 0.0 3.0 0 )

12. Test the wagon and load in MSTS.
13. If all is well, move the new Common.Loads into the wagon folder and rename your main Common.Loads folder back to Common.Loads.
14. Copy the new Common.Loads folder into the Trainset folder and allow to overwrite.
15. Test again and, if all is well, delete the LOAD ace and LOAD shape files from your wagon folder. It is recommended that the relevant Common.Loads folder is kept in the new wagon folder as a backup. It is also strongly recommended that a copy is sent to Ian Macmillan to add to the Master Common.Loads.

ALEC - Supporter of MSTS and TSSH!
rufuskins- Posts : 3728
Join date : 2013-01-17
Age : 76
Location : Milnrow, Lancashire
 Similar topics
» MSTS - Helpful Facts and Links - Part 16 (POLYMASTER use and links)
» MSTS - Helpful Facts and Links - Part 35 (Unable to install some MSTS route CDs)
» MSTS - Helpful Facts and Links - Part 27 (Vehicle SOUNDS in MSTS) by Ged (Slipperman12)
» MSTS - Helpful Facts and Links - Part 30 (MSTS ROUTE Folder Content)
» MSTS - Helpful Facts and Links - Part 19 (An alternative approach to re-installing MSTS)
Page 1 of 1
Permissions in this forum:
You cannot reply to topics in this forum
 Home
Home