PART 2 – INSTALLING AN ITEM OF STOCK TO YOUR MSTS FOLDER
Page 1 of 1
 PART 2 – INSTALLING AN ITEM OF STOCK TO YOUR MSTS FOLDER
In this series of posts I will outline some of the simple tasks that I have developed for my own use over the years. To the majority these will seem overly simplistic, and possibly blatantly obvious, but if it helps one simmer then I consider it a success. I hope to add more parts as time goes on, and these could include how to install routes, stock, etc.
PART 2 – INSTALLING AN ITEM OF STOCK TO YOUR MSTS FOLDER
1. Download the required item from UKTS, Trainsim, etc. to a temporary location. In my case it goes to the folder named “Downloads” – this is the default location for my Windows 7 OS.

2. As an example let us say that we want to install a downloaded file “UKTS_25007_Classs377420_Southern”. It should be noted that downloaded files are typically in a zipped format.

3. What I then do is right click on the chosen zipped file and go to “7-Zip” – this is my chosen application for zipping and unzipping files and folders.

4. Move the mouse over the “7-Zip” line and left click on “Extract to UKTS_25007_Classs377420_Southern\”.

5. Depending upon the size of the file you may or may not see the unzipping process – in this case it is too quick to properly register on the screen. This process will locate the unzipped folder into the same location.

6. Double click on this folder to open it, which will give the following:-

7. The “Readme” file will typically give details of the item, information on installation and copyright. It is recommended that it is read at this stage.

8. The other file is an installation file, and you double click on this and this appears:-

9. You then follow the guiding installation notes, starting by clicking on “Next”.

10. This takes you to an information screen (typically a repeat of the Readme contents), and you then click on “Next”.

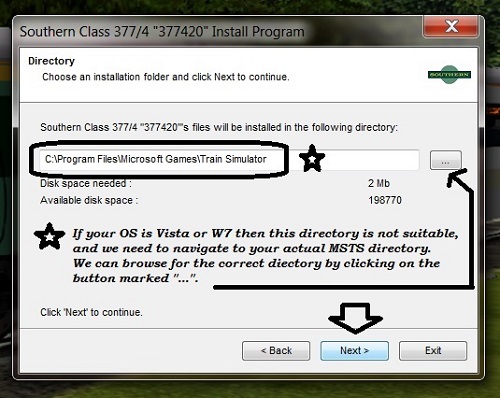
11. This takes you to the directory screen, which allows you to choose the destination for your item. In this instance the installation file has taken “C:\Programme Files\Microsoft Games\Train Simulator” as the default location. If you are using XP as your OS then this would be OK, but as we all know this is not suitable for either Vista or W7 OS’s. Therefore we need to change to the location of your MSTS installation.

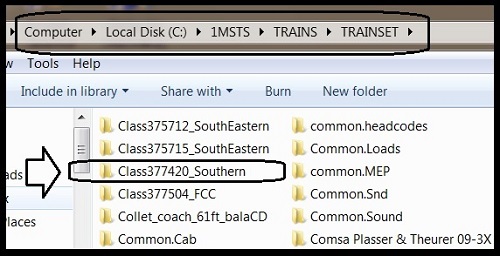
12. After browsing you can reach your MSTS directory – see below – and you can then click on “Next”.

13. After clicking on “Next” you reach the stage where the actual installation takes place.

14. Clicking on “Start” begins the automatic installation of the item in “C:\1MSTS\Trains\Trainset”.

15. Clicking on “Next” takes you out of the installation process, and you can go to your “Trainset” and check for the presence of the item.

16. This procedure looks more complicated than it really is, but it is always worth backing up folders, etc. in case of mistakes.
PART 2 – INSTALLING AN ITEM OF STOCK TO YOUR MSTS FOLDER
1. Download the required item from UKTS, Trainsim, etc. to a temporary location. In my case it goes to the folder named “Downloads” – this is the default location for my Windows 7 OS.

2. As an example let us say that we want to install a downloaded file “UKTS_25007_Classs377420_Southern”. It should be noted that downloaded files are typically in a zipped format.

3. What I then do is right click on the chosen zipped file and go to “7-Zip” – this is my chosen application for zipping and unzipping files and folders.

4. Move the mouse over the “7-Zip” line and left click on “Extract to UKTS_25007_Classs377420_Southern\”.

5. Depending upon the size of the file you may or may not see the unzipping process – in this case it is too quick to properly register on the screen. This process will locate the unzipped folder into the same location.

6. Double click on this folder to open it, which will give the following:-

7. The “Readme” file will typically give details of the item, information on installation and copyright. It is recommended that it is read at this stage.

8. The other file is an installation file, and you double click on this and this appears:-

9. You then follow the guiding installation notes, starting by clicking on “Next”.

10. This takes you to an information screen (typically a repeat of the Readme contents), and you then click on “Next”.

11. This takes you to the directory screen, which allows you to choose the destination for your item. In this instance the installation file has taken “C:\Programme Files\Microsoft Games\Train Simulator” as the default location. If you are using XP as your OS then this would be OK, but as we all know this is not suitable for either Vista or W7 OS’s. Therefore we need to change to the location of your MSTS installation.

12. After browsing you can reach your MSTS directory – see below – and you can then click on “Next”.

13. After clicking on “Next” you reach the stage where the actual installation takes place.

14. Clicking on “Start” begins the automatic installation of the item in “C:\1MSTS\Trains\Trainset”.

15. Clicking on “Next” takes you out of the installation process, and you can go to your “Trainset” and check for the presence of the item.

16. This procedure looks more complicated than it really is, but it is always worth backing up folders, etc. in case of mistakes.

ALEC - Supporter of MSTS and TSSH!
rufuskins- Posts : 3728
Join date : 2013-01-17
Age : 76
Location : Milnrow, Lancashire
 Similar topics
» MSTS - Helpful Facts and Links - Part 19 (An alternative approach to re-installing MSTS)
» (Re) installing MSTS on Windows 7
» MSTS - Helpful Facts and Links - Part 30 (MSTS ROUTE Folder Content)
» PART 1 – MAKING A COPY OF YOUR MSTS FOLDER
» MSTS - Helpful Facts and Links - Part 20 (Locomotive Folder Content)
» (Re) installing MSTS on Windows 7
» MSTS - Helpful Facts and Links - Part 30 (MSTS ROUTE Folder Content)
» PART 1 – MAKING A COPY OF YOUR MSTS FOLDER
» MSTS - Helpful Facts and Links - Part 20 (Locomotive Folder Content)
Page 1 of 1
Permissions in this forum:
You cannot reply to topics in this forum
 Home
Home